INSERT
Introduction
The INSERT statement is one of the core Data Manipulation Language (DML) commands in SQL. It allows you to add new rows of data into existing tables in your database.
In this tutorial, you will learn:
- How to insert single rows into a table
- How to insert multiple rows at once
- How to insert data from another table
- How to handle NULL values and DEFAULT columns
- Best practices for inserting data safely
Basic INSERT Syntax
The INSERT statement adds new records to a table. There are two main forms of the INSERT statement.
Form 1: Specifying Columns (Recommended)
INSERT INTO table_name (column1, column2, column3, ...)
VALUES (value1, value2, value3, ...);
This form explicitly lists which columns you're inserting into. It's the recommended approach because:
- It's clear which values go into which columns
- Column order doesn't matter
- You can skip columns with DEFAULT values or that allow NULL
Form 2: All Columns (Order Matters)
INSERT INTO table_name
VALUES (value1, value2, value3, ...);
This form inserts values into ALL columns in the order they were defined in the table. This is less safe because:
- You must provide values for every column
- Order must exactly match the table definition
- If the table structure changes, your query may break
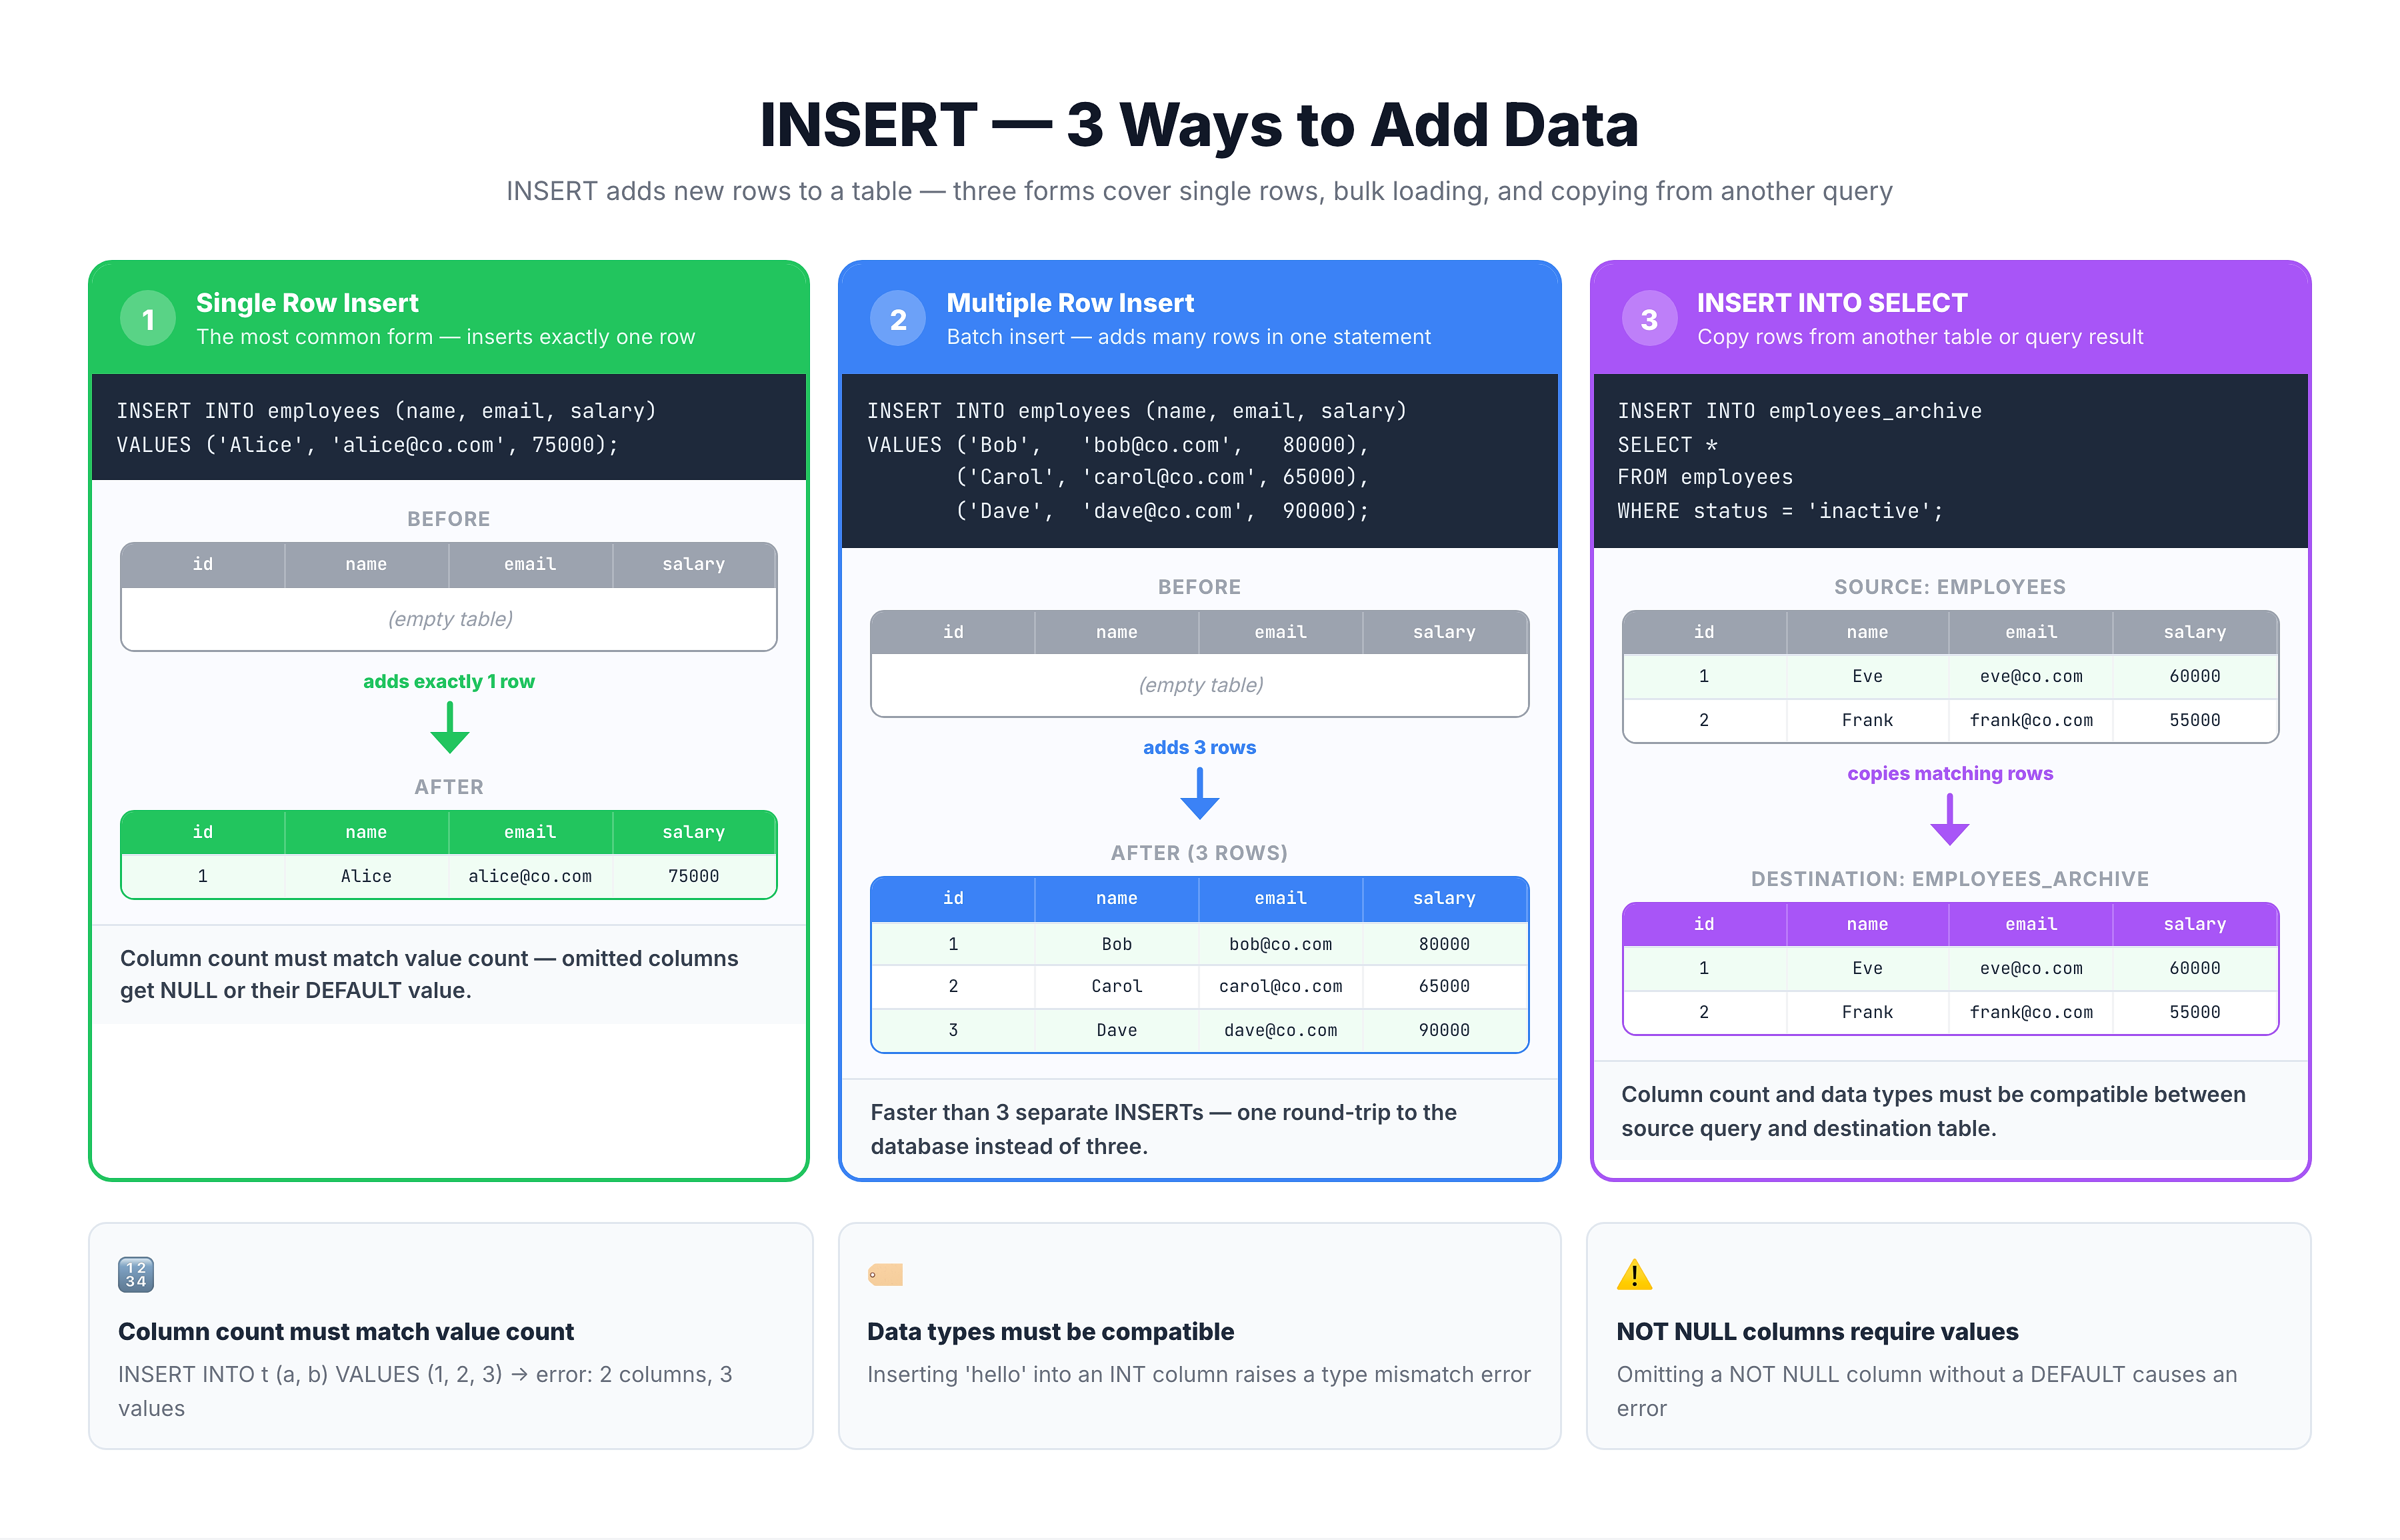
Inserting a Single Row
Let's start with the most common use case: inserting one row of data.
Example: Insert a Customer
Imagine we have a customers table:
CREATE TABLE customers (
    customer_id INTEGER PRIMARY KEY,
    first_name TEXT NOT NULL,
    last_name TEXT NOT NULL,
    email TEXT UNIQUE,
    city TEXT,
    signup_date TEXT DEFAULT CURRENT_DATE
);
Insert with All Columns Specified
INSERT INTO customers (customer_id, first_name, last_name, email, city, signup_date)
VALUES (1, 'John', 'Smith', 'john.smith@email.com', 'São Paulo', '2024-01-15');
Insert with Only Required Columns
INSERT INTO customers (customer_id, first_name, last_name)
VALUES (2, 'Maria', 'Santos');
In this case:
emailbecomes NULL (not provided, allows NULL)citybecomes NULLsignup_dateuses its DEFAULT value (CURRENT_DATE)
Value Types
Make sure to match value types with column types:
| Data Type | Value Format | Example |
|---|---|---|
| INTEGER | No quotes | 42, -100, 0 |
| REAL | No quotes | 3.14, 99.99 |
| TEXT | Single quotes | 'John', 'São Paulo' |
| NULL | No quotes | NULL |
| Date | Single quotes | '2024-01-15' |
Inserting Multiple Rows
You can insert multiple rows in a single INSERT statement by providing multiple sets of values.
Syntax
INSERT INTO table_name (column1, column2, column3)
VALUES
    (value1a, value2a, value3a),
    (value1b, value2b, value3b),
    (value1c, value2c, value3c);
Example: Insert Multiple Products
INSERT INTO products (product_id, product_name, category, price)
VALUES
    (101, 'Laptop', 'Electronics', 999.99),
    (102, 'Headphones', 'Electronics', 149.99),
    (103, 'Coffee Mug', 'Kitchen', 12.99),
    (104, 'Notebook', 'Office', 4.99);
Why Use Multi-Row INSERT?
- Performance - One statement is faster than multiple separate INSERTs
- Atomicity - All rows are inserted in a single transaction
- Cleaner Code - Less repetitive SQL to write
SQLite Limitation
SQLite supports multi-row INSERT (since version 3.7.11). If you're using an older version, you would need separate INSERT statements.
INSERT INTO SELECT
You can insert data from one table into another using INSERT INTO SELECT. This is powerful for copying data, creating backups, or transforming data.
Syntax
INSERT INTO target_table (column1, column2, ...)
SELECT column1, column2, ...
FROM source_table
WHERE condition;
Example 1: Copy All Rows
-- Create a backup of high-value orders
INSERT INTO orders_archive (order_id, customer_id, order_date, total)
SELECT order_id, customer_id, order_purchase_timestamp, payment_value
FROM olist_orders_dataset o
JOIN olist_order_payments_dataset p ON o.order_id = p.order_id
WHERE p.payment_value > 1000;
Example 2: Insert Aggregated Data
-- Populate a summary table
INSERT INTO customer_city_stats (city, customer_count)
SELECT customer_city, COUNT(*)
FROM olist_customers_dataset
GROUP BY customer_city;
Example 3: Copy with Transformation
-- Insert normalized city names
INSERT INTO normalized_cities (city_name, state_code)
SELECT UPPER(customer_city), customer_state
FROM olist_customers_dataset
WHERE customer_city IS NOT NULL;
Important Notes
- The number of columns in SELECT must match the number in INSERT
- Data types must be compatible
- The source and target can be the same table (with care to avoid infinite loops)
- You can use any valid SELECT query including JOINs, GROUP BY, etc.
Handling NULL and DEFAULT Values
Understanding how NULL and DEFAULT values work with INSERT is crucial for data integrity.
Inserting NULL Explicitly
You can explicitly insert NULL into any column that allows it:
INSERT INTO customers (customer_id, first_name, last_name, email)
VALUES (5, 'Carlos', 'Silva', NULL);
Omitting Columns with DEFAULT
If a column has a DEFAULT value and you omit it, the default is used:
-- Table definition
CREATE TABLE orders (
    order_id INTEGER PRIMARY KEY,
    status TEXT DEFAULT 'pending',
    created_at TEXT DEFAULT CURRENT_TIMESTAMP
);

-- Insert without specifying status or created_at
INSERT INTO orders (order_id)
VALUES (1001);

-- Result: status = 'pending', created_at = current timestamp
Using DEFAULT Keyword
You can explicitly request the default value:
INSERT INTO orders (order_id, status, created_at)
VALUES (1002, DEFAULT, DEFAULT);
Handling NOT NULL Constraints
If a column is NOT NULL and has no DEFAULT, you MUST provide a value:
-- This will fail
INSERT INTO customers (customer_id, last_name)  -- missing first_name which is NOT NULL
VALUES (10, 'Santos');

-- Error: NOT NULL constraint failed: customers.first_name
INSERT OR REPLACE / UPSERT
Sometimes you want to insert a row, but if it already exists (based on a UNIQUE or PRIMARY KEY), update it instead. This is often called an "upsert" operation.
INSERT OR REPLACE (SQLite)
In SQLite, you can use INSERT OR REPLACE:
INSERT OR REPLACE INTO products (product_id, product_name, price)
VALUES (101, 'Laptop Pro', 1299.99);
If a product with product_id 101 exists, it gets replaced. Otherwise, a new row is inserted.
INSERT OR IGNORE
If you want to skip rows that would cause constraint violations:
INSERT OR IGNORE INTO products (product_id, product_name, price)
VALUES (101, 'Laptop', 999.99);
This silently skips the insert if product_id 101 already exists.
ON CONFLICT Clause (SQLite 3.24+)
For more control, use the ON CONFLICT clause:
INSERT INTO products (product_id, product_name, price)
VALUES (101, 'Laptop Pro', 1299.99)
ON CONFLICT(product_id) DO UPDATE SET
    product_name = excluded.product_name,
    price = excluded.price;
excluded refers to the row that was attempted to be inserted.
Comparison
| Clause | Behavior |
|---|---|
| INSERT OR REPLACE | Delete old row, insert new row |
| INSERT OR IGNORE | Skip insert if conflict |
| ON CONFLICT DO UPDATE | Update existing row |
| ON CONFLICT DO NOTHING | Same as INSERT OR IGNORE |
Returning Inserted Data
Sometimes you need to get back information about the row you just inserted, especially auto-generated values like primary keys.
RETURNING Clause (SQLite 3.35+)
Modern SQLite supports the RETURNING clause:
INSERT INTO customers (first_name, last_name, email)
VALUES ('Ana', 'Costa', 'ana@email.com')
RETURNING customer_id, first_name, last_name;
This returns the inserted row with any auto-generated values.
Getting Last Insert ID
In SQLite, you can also get the last auto-increment ID:
-- After an INSERT
SELECT last_insert_rowid();
Use Cases
- Get auto-generated primary keys for use in related inserts
- Verify inserted data including any DEFAULT values applied
- Audit logging - confirm what was actually inserted
Practice
Let's practice inserting data into tables. We'll create tables and then insert data into them.
Exercise 1: Basic Single Row Insert
Create a products table and insert a single product:
-- First, create the table
CREATE TABLE IF NOT EXISTS products_demo (
    product_id INTEGER PRIMARY KEY,
    product_name TEXT NOT NULL,
    category TEXT,
    price REAL NOT NULL,
    stock_quantity INTEGER DEFAULT 0
);

-- Insert a single product
INSERT INTO products_demo (product_id, product_name, category, price, stock_quantity)
VALUES (1, 'Wireless Mouse', 'Electronics', 29.99, 150);
Exercise 2: Insert Multiple Rows
Insert multiple products in a single statement:
-- Insert multiple products at once
INSERT INTO products_demo (product_id, product_name, category, price, stock_quantity)
VALUES
    (2, 'Mechanical Keyboard', 'Electronics', 89.99, 75),
    (3, 'USB-C Hub', 'Electronics', 45.99, 200),
    (4, 'Monitor Stand', 'Furniture', 59.99, 50),
    (5, 'Desk Lamp', 'Furniture', 34.99, 120);
Exercise 3: Insert with DEFAULT Values
Insert a product without specifying stock_quantity (uses DEFAULT):
-- Insert without stock_quantity - it will use the DEFAULT value of 0
INSERT INTO products_demo (product_id, product_name, category, price)
VALUES (6, 'Webcam HD', 'Electronics', 79.99);

-- Verify the inserted data
SELECT * FROM products_demo WHERE product_id = 6;
Exercise 4: INSERT INTO SELECT
Create a summary table and populate it from existing data:
-- Create a customer city summary table
CREATE TABLE IF NOT EXISTS city_customer_counts (
    city_name TEXT PRIMARY KEY,
    state_code TEXT,
    total_customers INTEGER
);

-- Insert aggregated data from the customers dataset
INSERT INTO city_customer_counts (city_name, state_code, total_customers)
SELECT customer_city, customer_state, COUNT(*)
FROM olist_customers_dataset
GROUP BY customer_city, customer_state
ORDER BY COUNT(*) DESC
LIMIT 20;
Exercise 5: Verify Inserted Data
Query the tables we created to see the inserted data:
-- View all products we inserted
SELECT * FROM products_demo ORDER BY product_id;

-- View the city customer counts
-- SELECT * FROM city_customer_counts ORDER BY total_customers DESC;
Common Errors and Solutions
Error 1: UNIQUE Constraint Failed
-- Error: UNIQUE constraint failed: customers.email
INSERT INTO customers (customer_id, first_name, last_name, email)
VALUES (10, 'Test', 'User', 'existing@email.com');
Solution: Use INSERT OR IGNORE, INSERT OR REPLACE, or choose a unique value.
Error 2: NOT NULL Constraint Failed
-- Error: NOT NULL constraint failed: customers.first_name
INSERT INTO customers (customer_id, last_name)
VALUES (11, 'Santos');
Solution: Provide a value for all NOT NULL columns without defaults.
Error 3: Data Type Mismatch
-- This might cause unexpected behavior
INSERT INTO products (product_id, price)
VALUES (100, 'expensive');  -- 'expensive' is not a number
Solution: SQLite is flexible with types, but always use appropriate data types.
Error 4: Foreign Key Violation
-- Error: FOREIGN KEY constraint failed
INSERT INTO orders (order_id, customer_id)
VALUES (1, 999);  -- customer_id 999 doesn't exist
Solution: Ensure the referenced row exists in the parent table first.
Best Practices
1. Always Specify Column Names
-- Good: Explicit columns
INSERT INTO customers (customer_id, first_name, last_name)
VALUES (1, 'John', 'Doe');

-- Avoid: All columns implicitly
INSERT INTO customers
VALUES (1, 'John', 'Doe', NULL, NULL, NULL);
2. Use Transactions for Multiple Inserts
BEGIN TRANSACTION;
    INSERT INTO orders (order_id, customer_id) VALUES (1, 100);
    INSERT INTO order_items (order_id, product_id, quantity) VALUES (1, 50, 2);
    INSERT INTO order_items (order_id, product_id, quantity) VALUES (1, 51, 1);
COMMIT;
If any insert fails, you can ROLLBACK all changes.
3. Validate Data Before Inserting
- Check for NULL values in required fields
- Verify foreign key references exist
- Validate data formats (dates, emails, etc.)
4. Use Parameterized Queries in Applications
When inserting data from user input, never concatenate strings:
# Bad - SQL injection risk
cursor.execute(f"INSERT INTO users (name) VALUES ('{user_input}')")

# Good - Parameterized
cursor.execute("INSERT INTO users (name) VALUES (?)", (user_input,))
5. Consider Performance for Bulk Inserts
- Use multi-row INSERT for small batches
- Use transactions to batch many inserts
- Consider disabling indexes during bulk loads, then re-enable
Summary
What You Learned
✅ Basic INSERT syntax with explicit column names
✅ Inserting multiple rows in a single statement
✅ Using INSERT INTO SELECT to copy data between tables
✅ Handling NULL and DEFAULT values
✅ INSERT OR REPLACE and ON CONFLICT for upsert operations
✅ Using RETURNING to get inserted data back
Key Takeaways
- Always specify column names - Makes code clearer and more maintainable
- Use multi-row INSERT - More efficient than multiple single inserts
- INSERT INTO SELECT is powerful - For copying, transforming, or aggregating data
- Handle conflicts gracefully - Use OR REPLACE, OR IGNORE, or ON CONFLICT
- Validate before inserting - Check constraints, data types, and foreign keys
Quick Reference
| Task | Syntax |
|---|---|
| Single row | INSERT INTO t (c1) VALUES (v1) |
| Multiple rows | INSERT INTO t (c1) VALUES (v1), (v2) |
| From query | INSERT INTO t SELECT ... FROM ... |
| Upsert | INSERT OR REPLACE INTO t ... |
| Skip conflicts | INSERT OR IGNORE INTO t ... |
Next Up
Continue to UPDATE to learn how to modify existing data, or jump to DELETE to learn how to remove data from tables.