Use Case Diagrams — Who Does What
Introduction
Before you can design a system, you need to answer a fundamental question: Who uses this system, and what can they do with it?
A use case diagram answers exactly that. It's the bird's-eye view of your system — showing the actors (people, systems, or devices that interact with your software) and the use cases (the things those actors can do). It doesn't dive into how things work internally — that's what class diagrams and sequence diagrams are for. A use case diagram captures scope: what's in the system and what's outside it.
Think of it like the table of contents for your system. A table of contents tells you what chapters exist and who wrote them — not what's inside each chapter.
In LLD interviews, the use case diagram is your first deliverable. After clarifying requirements with the interviewer, you sketch a use case diagram to confirm: "Here are the actors and features I'm designing for. Did I miss anything?" This alignment step prevents you from designing the wrong system.
We'll continue modeling our Library Management System — the same domain from the previous tutorial on class diagrams.
Core Elements of a Use Case Diagram
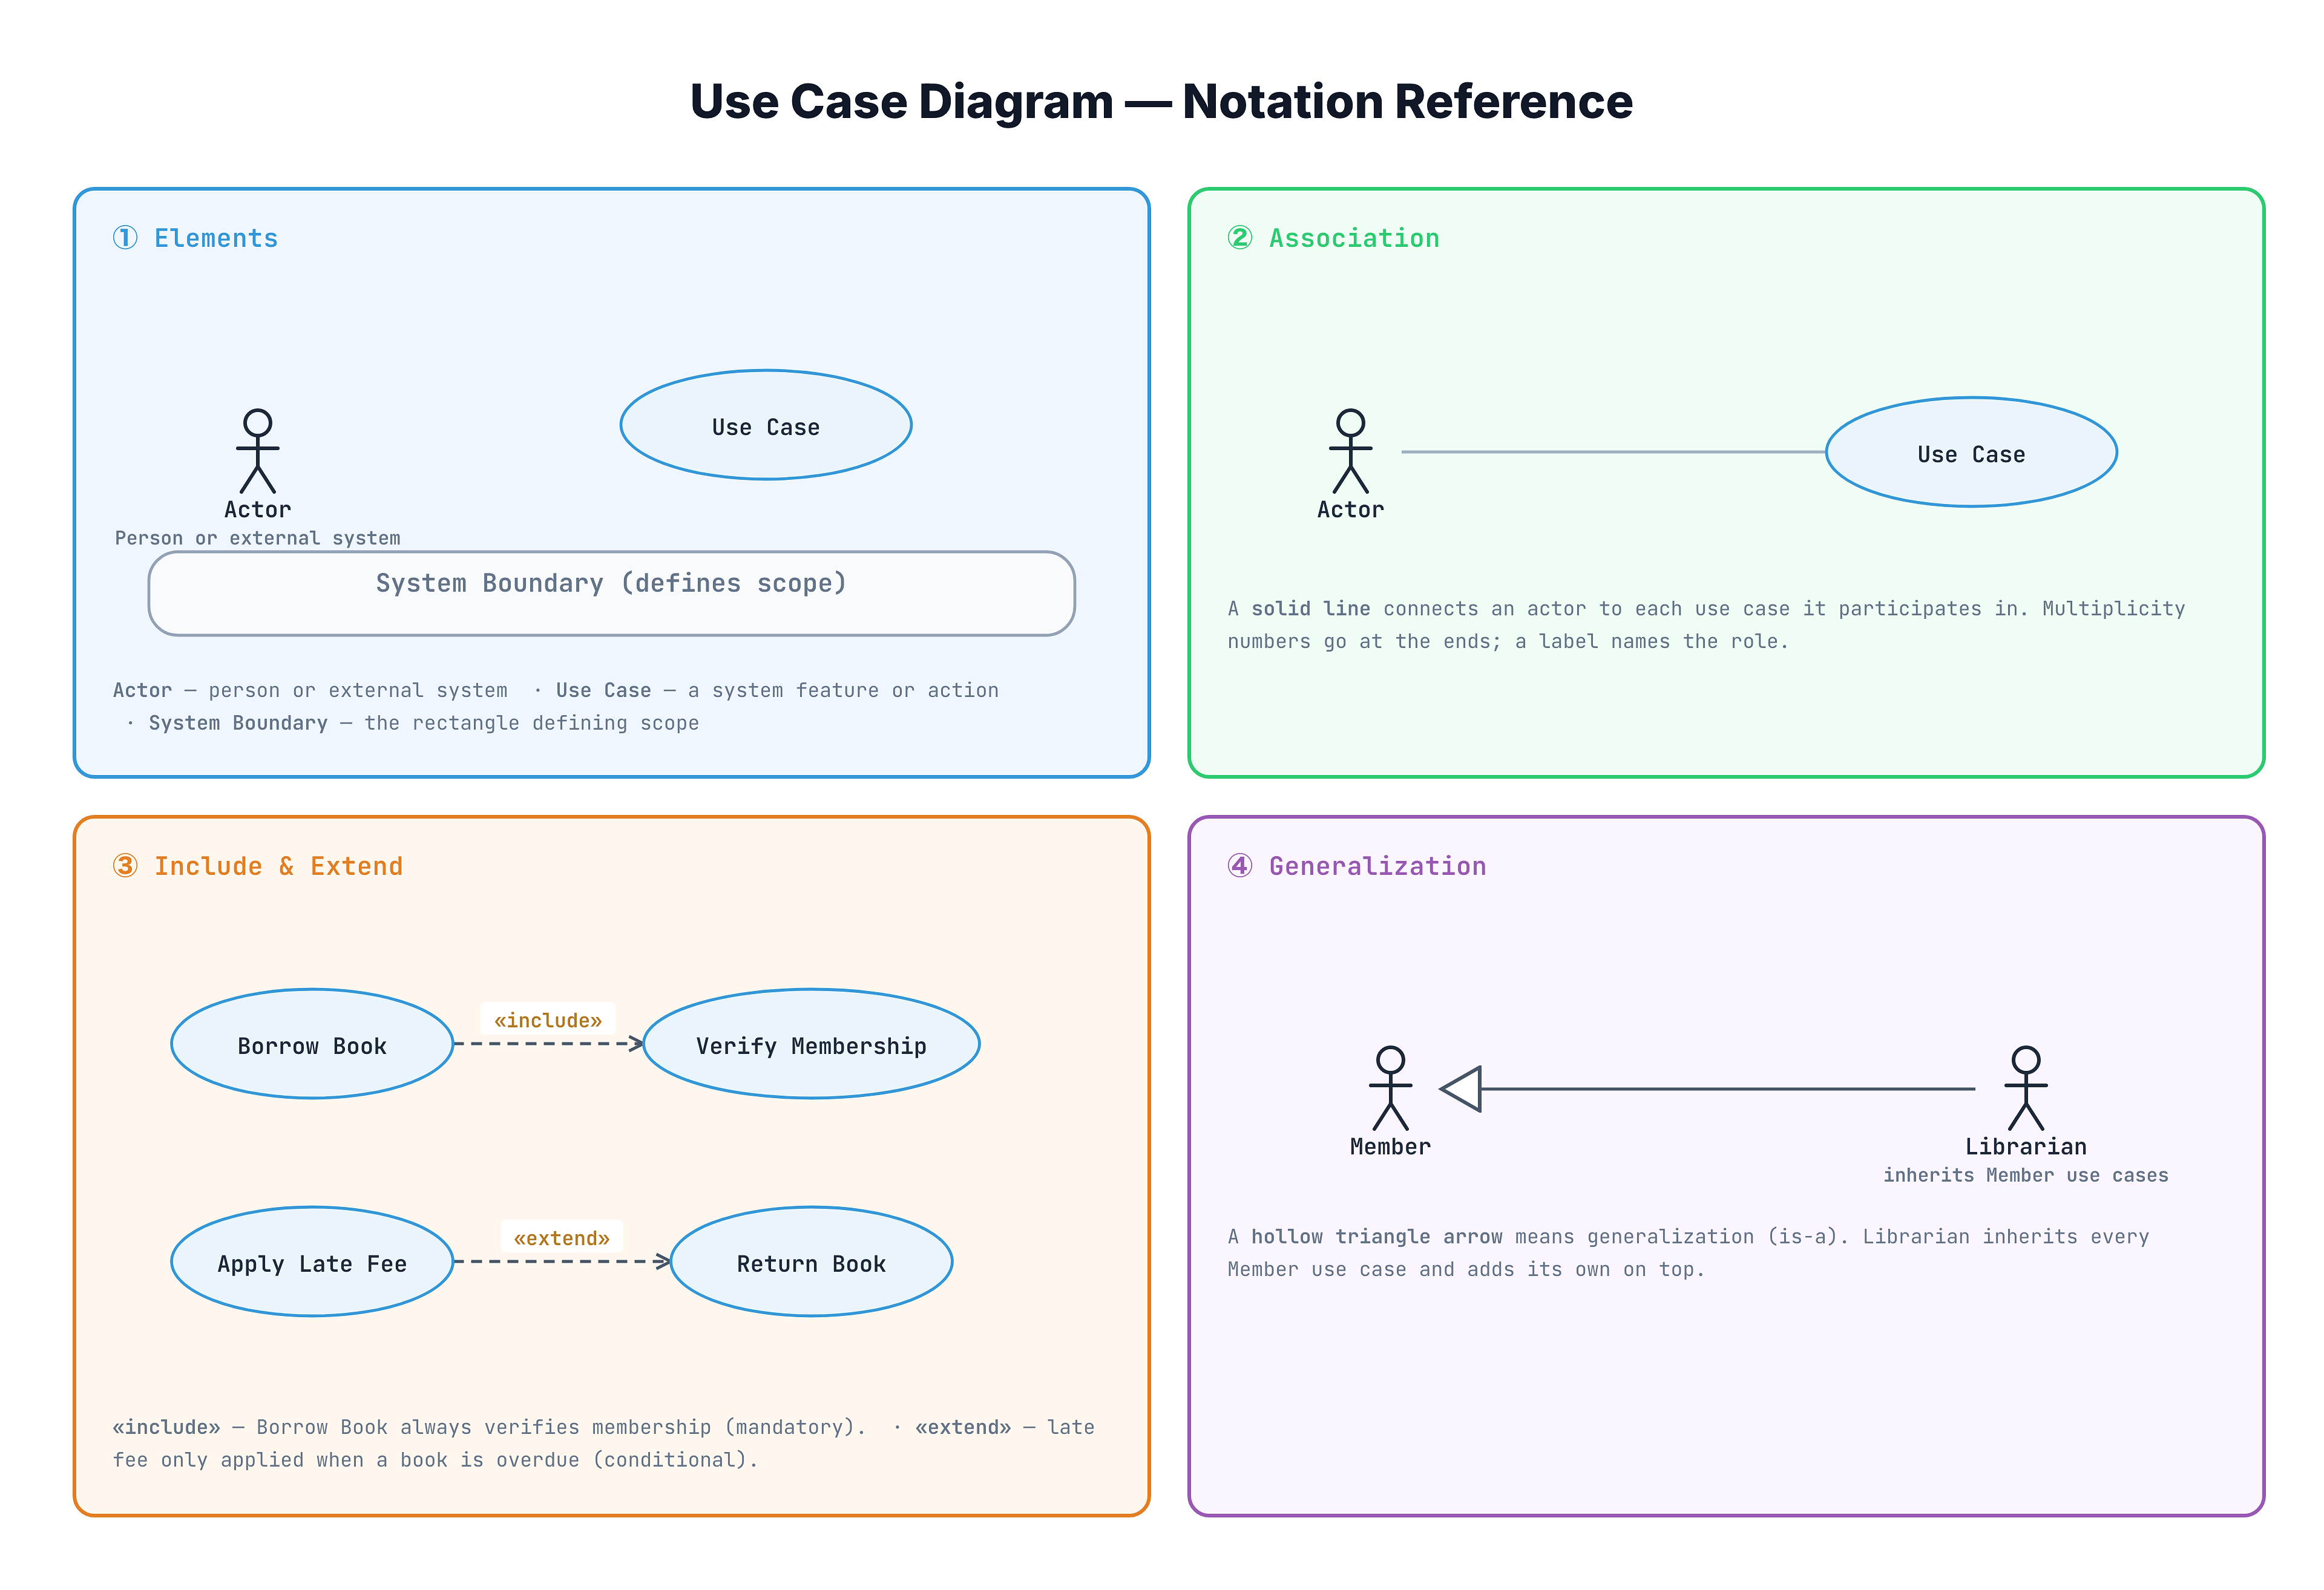
A use case diagram has four elements:
1. Actors (Stick Figures)
An actor is anything outside the system that interacts with it. Actors are drawn as stick figures with their role name below.
Actors can be:
- Human users: Member, Librarian, Administrator
- External systems: Payment Gateway, Email Service, Notification System
- Time-based triggers: Scheduler (for automated overdue checks)
Key rule: An actor is outside the system boundary. It triggers or receives output from use cases — it doesn't live inside your software.
2. Use Cases (Ovals)
A use case is a specific action or feature the system provides. Each use case is drawn as an oval (ellipse) with the use case name inside.
Good use case names are verb phrases that describe what happens from the actor's perspective:
- ✅ "Borrow Book", "Search Catalog", "Pay Fine"
- ❌ "Book", "Database", "Loan Handler" — these are nouns/classes, not actions
3. System Boundary (Rectangle)
A rectangle labeled with the system name encloses all use cases. Everything inside is part of your system; actors sit outside.
This boundary is critical — it defines scope. In an interview, it tells the interviewer exactly what you're designing and what you're leaving out.
4. Relationships (Lines and Arrows)
- Association (solid line): Connects an actor to a use case they participate in
- Include (dashed arrow,
<<include>>): Use case A always triggers use case B as part of its flow. The arrow points from A to B. - Extend (dashed arrow,
<<extend>>): Use case B optionally extends use case A under certain conditions. The arrow points from B to A. - Generalization (solid line, hollow triangle): One actor inherits all use cases of another actor.
LibrariangeneralizesMember— a librarian can do everything a member can, plus more.
Notation Guide
Include vs Extend — The Key Distinction
The <<include>> and <<extend>> relationships confuse almost everyone. Here's the definitive explanation:
<<include>> — "Always does this as part of that"
When use case A includes use case B, B is a mandatory step that always happens as part of A. The arrow points from A (the caller) to B (the included behavior).
Library example: "Borrow Book" includes "Verify Membership" — every time a book is borrowed, the system MUST check that the member's account is valid. You can't borrow without verification.
Think of it as: function call. borrowBook() always calls verifyMembership() inside.
<<extend>> — "Sometimes adds this to that"
When use case B extends use case A, B is an optional behavior that only happens under certain conditions. The arrow points from B (the extension) to A (the base use case).
Library example: "Send Overdue Notification" extends "Return Book" — a notification is only sent IF the book is overdue. If returned on time, no notification.
Think of it as: optional plugin. The base use case works fine without it.
Common Mistakes
- ❌ Overusing include/extend. If you have 15 include arrows, you're over-decomposing. Keep use cases at the user-goal level, not the technical-step level.
- ❌ Getting the arrow direction wrong. Include: arrow FROM the base TO the included. Extend: arrow FROM the extension TO the base. Reversing these is the #1 mistake in interviews.
- ❌ Using extends for mandatory steps. If it always happens, it's include, not extend.
Visualization
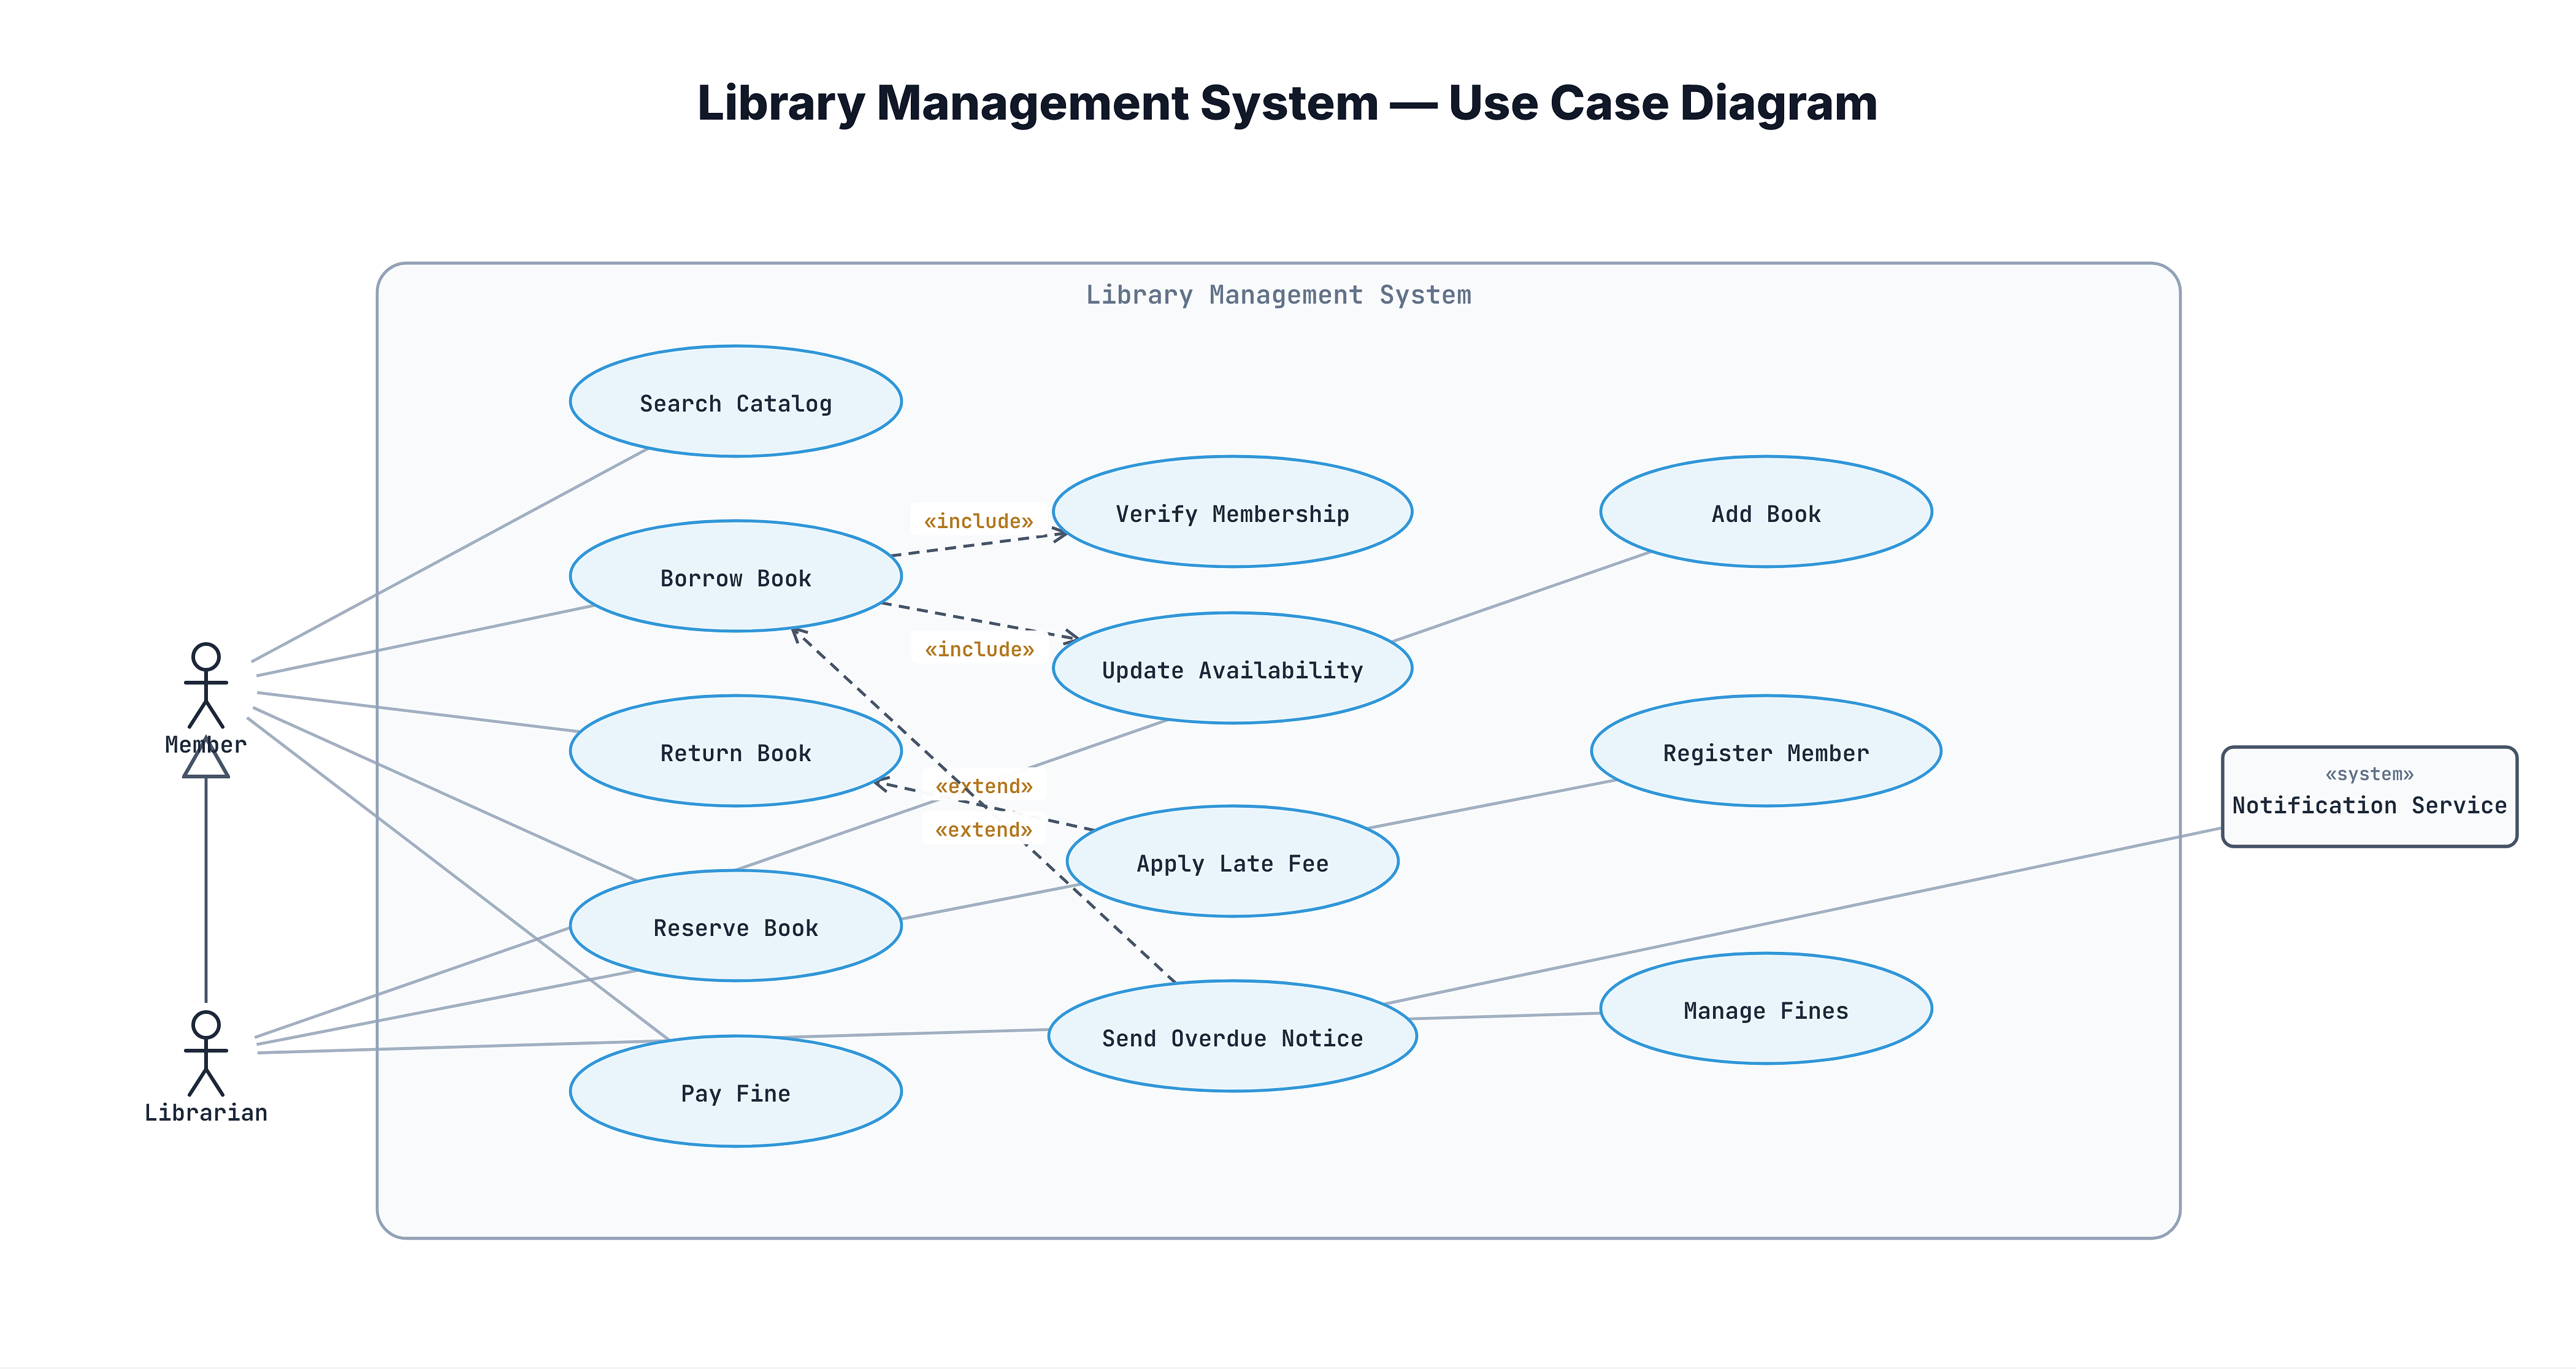
Complete Example — Library Management System Use Case Diagram
Here's the complete use case diagram for our Library Management System. Notice how it captures the entire scope of the system in one view — something no class diagram or sequence diagram can do.
Actors:
- Member — can search, borrow, return, reserve, and pay fines
- Librarian — inherits all Member capabilities, plus can add books, register members, and manage fines
- Notification Service — external system that sends emails/SMS for overdue notices
Include relationships (mandatory steps):
- Borrow Book → Verify Membership (always check membership before lending)
- Borrow Book → Update Availability (always mark book as borrowed)
Extend relationships (conditional behavior):
- Apply Late Fee → Return Book (only if the book is overdue)
- Send Overdue Notice → Borrow Book (only triggered after due date passes)
How to Identify Actors and Use Cases
Finding Actors
Ask these questions about your system:
- Who uses the system? → Human actors (Member, Librarian, Admin)
- What external systems does it communicate with? → System actors (Payment Gateway, Email Service, Database)
- Are there time-triggered events? → Temporal actors (Scheduler, Cron Job)
- Do different users have different permissions? → Each distinct permission set is likely a separate actor
Finding Use Cases
For each actor, ask:
- What tasks does this actor perform? → Each task is a use case candidate
- What information does the actor need from the system? → Read operations (Search Catalog, View History)
- What information does the actor provide to the system? → Write operations (Register, Add Book)
- Does the actor need to be notified of anything? → Notification use cases
Granularity Guide
Use cases should be at the user-goal level — something a user sits down to accomplish in one session:
- ✅ Right granularity: "Borrow Book", "Return Book", "Search Catalog" — each is a complete user goal
- ❌ Too detailed: "Enter ISBN", "Click Submit Button", "Validate Input" — these are UI steps, not user goals
- ❌ Too broad: "Manage Library" — this isn't actionable; break it into specific goals
Common Mistakes in Use Case Diagrams
Mistake 1: Putting Actors Inside the Boundary
❌ Wrong: Drawing the Member stick figure inside the system rectangle.
✅ Right: Actors are ALWAYS outside the system boundary. They interact with the system — they're not part of it.
Mistake 2: Confusing Use Cases with Classes
❌ Wrong: Ovals labeled "Book", "Loan", "Database" — these are nouns/entities.
✅ Right: Use cases are actions: "Borrow Book", "Return Book", "Search Catalog". They describe what the system does, not what it is.
Mistake 3: Arrows Between Use Cases Without Stereotypes
❌ Wrong: Drawing a plain solid line between two use cases.
✅ Right: Use cases connect to each other only through <<include>> or <<extend>> (dashed arrows with stereotypes). They connect to actors through plain association lines.
Mistake 4: Over-Decomposing with Include
❌ Wrong: "Borrow Book" includes "Open Book Record", includes "Check ISBN", includes "Update Counter", includes "Generate Receipt" — turning the diagram into a flowchart.
✅ Right: Use include sparingly — only for genuinely shared, mandatory sub-behaviors that multiple use cases invoke. Keep the diagram at 8-12 use cases maximum.
Mistake 5: Showing Internal Data Flow
❌ Wrong: Adding arrows between use cases showing data flow like "book_id" or "member_record".
✅ Right: Use case diagrams show WHAT functionality exists and WHO uses it — not HOW data flows internally. That's the job of sequence diagrams and activity diagrams.
Use Case Diagrams in LLD Interviews
In an LLD interview, draw a use case diagram immediately after clarifying requirements. Here's why it's strategically valuable:
-
Scope alignment. You show the interviewer exactly what you're building. If they say "you missed the reservation feature," you catch it before investing 20 minutes in the wrong design.
-
Actor discovery. Drawing actors forces you to think about who uses the system — which directly informs class design later. Each human actor often maps to a class or role.
-
Feature completeness check. Listing use cases ensures you haven't forgotten key features. Interviewers notice missing functionality.
-
Sets up the class diagram. Use case nouns become classes. Use case verbs become methods. The use case diagram is the input to the class diagram you'll draw next — as we covered in the previous tutorial.
Time budget: Spend 2-3 minutes on the use case diagram. It doesn't need to be perfect — it needs to capture the right actors and the core use cases. Refine as you go.
You'll practice this exact workflow in S16 (The LLD Interview Framework), where we walk through a complete interview from requirements to code.
Key Takeaways
- A use case diagram answers "Who uses the system and what can they do?" — it captures actors, use cases, and system scope in one view
- Actors (stick figures) are outside the system boundary — they can be human users, external systems, or time-based triggers
- Use cases (ovals) are actions at the user-goal level — verb phrases like "Borrow Book", not nouns or UI steps
- Include means "always does this as a mandatory step" (arrow from base to included); Extend means "optionally adds this under certain conditions" (arrow from extension to base)
- Generalization between actors means one actor inherits all use cases of another —
LibrariangeneralizesMember - In LLD interviews, draw the use case diagram first (2-3 minutes) to align on scope — it feeds directly into your class diagram
- Keep diagrams at 8-12 use cases maximum — if you need more, you're over-decomposing